Aptify provides the ability for administrators and developers to easily create new wizards for Aptify without having to write and compile code in Visual Studio. Aptify's metadata-based wizards are defined as records within the Aptify system, and they utilize Aptify's Form Template and Process Pipeline functionality to display field information within the wizard and to provide conditional logic to create a streamlined and easy-to-follow process for the end user.
Note that this documentation refers to these types of wizards as metadata wizards to differentiate them from code-based wizards that are added to an Entity's Configuration > Actions tab (see Adding Wizards to an Entity and Developing Code-Based Wizards for more information on code-based wizards).
Aptify includes three production metadata wizards (the Membership Enrollment wizard, the Account Manager Transfer wizard, and the Bulk Write-Off wizard). It also includes an example metadata wizard, called the Sample New Company wizard, to illustrate some of the options available when creating a wizard. Note that the Sample New Company wizard is provided as a test wizard only and is not suitable for production use. It cannot be launched from anywhere within the Aptify interface by default to prevent a user from mistakenly running this sample. An administrator or developer can find this wizard in the Wizards service.
This topic provides the following sub-topics on how to create a metadata-based wizard in Aptify:
- Designing Metadata Wizards
- Creating the Wizards Record
- Defining the Wizard User Experience Tab
- Defining the Wizard Scope Tab
- Defining the Wizard UI Platforms Tab
- Linking the Wizard to a Help File
- Defining Wizard Pages
- Defining When Process Flows are Run for a Wizard
- Using Process Flows to Add Functionality and Conditional Paging Logic
- About the Advanced Wizard Options
Designing Metadata Wizards
Before you start defining a metadata wizard in Aptify, it is important to first determine what actions the wizard will perform. The next step is then to identify how you can build the wizard to accomplish these actions using the metadata wizard infrastructure.
This section provides suggestions for how to best design your wizard.
-
Consider Using a Staging Entity: The metadata wizard example in this section describes a simple wizard that operates on a single entity and its sub-types and is based on the standard Opportunities form. However, for more complicated wizard processes that involve updating multiple entities, you should consider using a staging entity. The three metadata wizards included with Aptify use staging entities to store user inputs within the wizard. The staging entity is the target entity for the wizard and the wizard's form template-based steps are tied to that entity. Then as a final step in the process, the wizard runs a process flow that takes the data from the staging entity's record and interacts with multiple entities as necessary.
- For example, the Membership Enrollment wizard uses a MembershipEnrollment staging entity to store the user inputs, such as company data, person data, and the selected membership product. Clicking the Finish button on the wizard creates a MembershipEnrollment record and fires a process flow that uses the data from that record to create a Company, Person, and/or Order as applicable.
- For example, the Membership Enrollment wizard uses a MembershipEnrollment staging entity to store the user inputs, such as company data, person data, and the selected membership product. Clicking the Finish button on the wizard creates a MembershipEnrollment record and fires a process flow that uses the data from that record to create a Company, Person, and/or Order as applicable.
- Review Form Template and Process Flow Documentation: If you have not already, see Administering Form Templates and Managing Process Pipelines as well as this topic on creating wizards to learn about what options are available when constructing a metadata wizard.
- Review Design of Wizards: The three fully functional metadata wizards provided will serve as examples of how an organization can develop its own complex process flows. Many of the process flow steps used by these wizards are rule-based so the text of those rules are available for review by system administrators and developers.
Creating the Wizards Record
Follow these steps to create a new Wizards record for a metadata wizard:
- Open a new record from the Wizards service, which appears in the Aptify Framework Administration application by default.
- Enter a Name for the wizard. This name will appear in the caption for the wizard screen if a Name Culture String is not specified.
- If using localization, specify a Name Culture String for the wizard. See Using Localization Administration.
- Enter a Description for the wizard.
- If using localization, specify a Description Culture String to localize the wizard's description text. See Using Localization Administration.
- Enter the Target Entity.
- This is the entity on whose records the wizard will operate. For example, if you are designing a wizard that will create new Opportunities records, the Target Entity is Opportunities.
- This is the entity on whose records the wizard will operate. For example, if you are designing a wizard that will create new Opportunities records, the Target Entity is Opportunities.
- Save the Wizards record.
- Configure the options on the User Experience tab. See Defining the Wizard User Experience Tab.
- Define the wizard's Scope to determine from where users can launch this wizard. See Defining the Wizard Scope Tab.
- If applicable, specify information about the Help file created for this wizard. See Linking the Wizard to a Help File.
- You must specify the supported user interface platforms for this wizard. See Defining the Wizard UI Platforms Tab.
- Define the steps for the wizard. See Defining Wizard Pages.
- If applicable, specify any process flows that should fire when the wizard is completed or cancelled. See Defining When Process Flows are Run for a Wizard.
See About the Advanced Wizard Options for information on advanced options to modify a wizard's default behavior and/or appearance.
Defining the Wizard User Experience Tab
Complete the fields on the User Experience tab to configure the behavior of the wizard and then save the Wizards record. This tab contains the options described below.
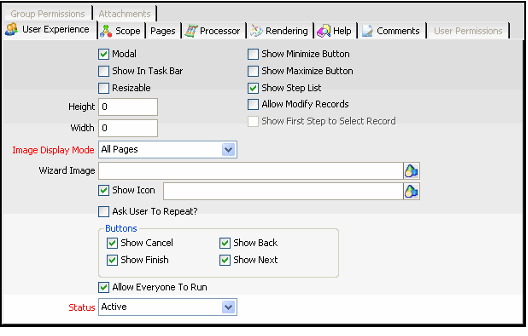
Modal
When selected, the wizard is modal and is displayed at the front of the application (cannot be sent behind another window). This is suitable if you believe a user needs to complete the wizard once launched.
Show In Task Bar
When selected, the wizard is added as an item in the Windows task bar at the bottom of the user's screen. This is only applicable when a user runs the Windows desktop application.
Resizable
When selected, the user can resize the wizard dialog.
Height
When greater than 0, this field specifies the height of the wizard dialog in pixels. However, if left at 0, the recommended and default value, the system automatically calculates the height by choosing the maximum height required to properly display the tallest page within the wizard.
Width
When greater than 0, this field specifies the width of the wizard dialog in pixels. However, if left at 0, the default value, the system automatically calculates the width by choosing the maximum width required to properly display the widest page within the wizard. Note that if the wizard displays an image and/or step list, then you should manually specify the width because the calculated width does not take these items into account (so the calculated width may not be wide enough).
Show Minimize Button
When selected, the minimize button appears in the upper right corner of the wizard dialog and the user can minimize the wizard.
Show Maximize Button
When selected, the maximize button appears in the upper right corner of the wizard dialog and the user can maximize the wizard so it fills the entire screen.
Show Step List
When selected, the wizard includes a step list on its left side that indicates each step in the wizard (it displays the name of each page specified on the wizard's Pages tab). Within the step list, the current step is displayed in bold.
Allow Modify Records
When selected, the wizard can modify existing records in the target entity (as well as create new records if applicable). To load an existing record into the wizard, a user either selects a record from the source view or enters a record in the First Step link box (described below).
Note that if are designing a wizard to operate on a set of records based on selections in a view from the source entity (which may be different from the target entity), you would use the SelectedItems property to pass in the IDs of those records to the wizard. See Using Process Flows to Add Functionality and Conditional Paging Logic for more information on this property.
Show First Step to Select Record
This option is only available when Allow Modify Records is selected. When selected, the wizard displays a link box dialog after the user launches the wizard for the first time. The link box is linked to the wizard's target entity. The user can then enter the existing record to modify. Note that if a user selects a record from a view before launching the wizard, the wizard pre-populates the link box with that record, assuming the wizard is launched from the target entity's view toolbar.
If this option is cleared and Allow Modify Records is selected, the user selects a record from the list view. This record's information is then passed into the wizard. However, the wizard will display the link box for subsequent runs of the wizard (if Ask User To Repeat? is enabled).
Note that if the user does not select any records before launching the wizard, the wizard will create a new record rather than modify an existing record (assuming a user provides values for all of the record's required fields).
Image Display Mode
Determines when the specified Wizard Image is displayed within the wizard. When applicable, the wizard image appears in the upper left corner of the wizard dialog, as shown below. The options are All Pages (on every page), First Page Only (only on first page), and None (do not display a wizard image).
Wizard Image
The Object Repository location of the image to display in the wizard. For best results, a typical wizard image should be around 125 pixels wide by 150 pixels tall.
Show Icon
When selected, the specified icon appears in the caption in the wizard dialog's upper left-hand corner (to the left of the wizard's name). If not specified, the wizard uses the default Aptify "A" as its icon. The text box to the right of the check box identifies the Object Repository location of the icon to display. In the example below, the wizard uses the Aptify Opportunities icon. Note that even if Show Icon is cleared, Aptify will use the specified image as the icon for the wizard when it is available on a view toolbar.
Ask User To Repeat?
When selected, the wizard asks the user if he or she wants to rerun the wizard again after completing an iteration. Note that for wizards that have the Allow Modify Records option enabled, the wizard displays a link box to let the user specify another record in the Target Entity to update (or create a new record by leaving the link box blank).
Show Cancel
When selected, the Cancel button appears in the wizard's button bar across the bottom of the dialog.
Show Finish
When selected, the Finish button appears in the wizard's button bar across the bottom of the dialog.
Show Back
When selected, the Back button appears in the wizard's button bar across the bottom of the dialog.
Show Next
When selected, the Next button appears in the wizard's button bar across the bottom of the dialog.
Allow Everyone to Run
If you want this wizard to be available to all users, select the Allow Everyone to Run option. If the wizard should only be available to a sub-set of users, clear the Allow Everyone to Run option and specify the appropriate Groups and/or Users on the Group Permissions and User Permissions tabs.
Status
When set to Active, the wizard is available for the users who have permission to it. When set to Inactive, the wizard is unavailable for all users.
Defining the Wizard Scope Tab
Complete the fields on the metadata Wizard record's Scope tab to how users can access a wizard. This tab contains the options described below.
Scope
Select one of the following options from the scope of the wizard:
- Global
- Application
- Entity
Linking a Global Wizard to a Dashboard Button
When you select this option, the wizard can be linked to a dashboard button for any dashboard in Aptify. Note that the wizard does not show up in a list view toolbar when this option is selected.
Follow these steps to add a button linked to a wizard:
- Open a new Button Properties record to add a button to a dashboard's button bar.
- See Configuring the Button Bar Component and Editing the Dashboard Button Bar for information on how to create a button bar and add buttons to a dashboard.
- See Configuring the Button Bar Component and Editing the Dashboard Button Bar for information on how to create a button bar and add buttons to a dashboard.
- From the General tab on the Button Properties form, select Generic Data Wizard from the Action Type drop-down field.
- Select the Action Properties tab.
- Enter the Target Entity for the wizard in the field provided. (Each wizard is linked to a Target Entity, as specified in the Wizards record's top area.)
- Select an available wizard from the drop-down list based on the Target Entity you selected.
- Note that only wizards with a scope of Global or Application are available for selection. Application-scoped wizards are only available if you are working with a dashboard linked to the wizard's specified application.
- Note that only wizards with a scope of Global or Application are available for selection. Application-scoped wizards are only available if you are working with a dashboard linked to the wizard's specified application.
- Click OK to save the button.
When a user clicks the button linked to the wizard, Aptify launches the wizard automatically.
Application
The wizard should only be available from a button on a dashboard linked to the specified application.
When you select this option, the wizard can be linked to a dashboard button for any dashboard in Aptify that is associated with the application you specify in the Application field. Note that the wizard does not show up in a list view toolbar when this option is selected. See the discussion on the Global scope above for information on how to link a wizard to a dashboard button.
Entity
The wizard is available from the specified entity's view toolbar. When you select this option, specify the appropriate entity in the Entity field. Typically, this entity is the same as the wizard's Target Entity but it can be different if applicable.
Note that wizards that are based on a user's view selection must be entity-scoped (for example, if you selected the Allow Modify Records option on the User Experience tab but did not select Show First Step to Select Record).
Run From Options
Select or clear the Run From check boxes as necessary.
- By default, the wizard always appears in the service's view toolbar for List views that are not prompted.
- The Aptify web interface supports the ability to control the availability of wizards using the Run From options. In previous releases, the Aptify web interface does not support the Run From options.
-
If you want the wizard to appear in the service toolbar (that is, the toolbar that appears in the main display window when a service is selected), select the Run From Entity Browser option. If you do not want the wizard to appear in the service toolbar, clear this option.
Any wizard that pulls data from a view should have the Run From Entity Browser option cleared.
This option is supported in the web interface. However, when this option is selected, the wizard is available in the web interface Quick Search, not in the entity browser.
-
If you want the wizard to appear in the view toolbar for a temporary list view, select the Run From Temporary View option. If you do not want the wizard to appear for temporary views, clear this option.
A temporary view is a list view that is constructed outside of the standard Views entity. This includes:
- Entity list views that appear under a related service tab of a form. One example is the Templates tab on the Form Template Parts form that displays the templates to which the part applies.
- Dashboard entity list views that are constructed using a custom SQL statement rather than an existing system view.
- If you want the wizard to appear in the view toolbar for a prompted list view, select in the Run From Prompted View option. If you do not want the wizard to appear for prompted views, clear this option.
Defining the Wizard UI Platforms Tab
The Wizard UI Platforms tab lists the Aptify user interface (UI) platforms that can be used to run this wizard. This topic describes how to add UI Platform records to this list.
New wizards cannot be run until supported UI platforms are defined.
Follow these steps:
- Determine whether you want this wizard to be available on just the Aptify web interface, just the Aptify Windows Desktop client, or both.
- Open a new Wizard UI Platforms Record.
- In the UI Platform ID field, enter the platform ID for a UI platform you wanted to support for this wizard.
- Enter HTML5 Web to add support for the Web Interface.
- Enter Windows Desktop Client to add support for the Desktop client.
- Click the link in the field to open the associated UI Platforms record. See About the UI Platforms Form.
- Click OK to save the record or click OK and New to open a new record to add support for the other UI platform to this wizard.
Linking the Wizard to a Help File
If applicable, you can link the wizard to a Microsoft CHM file that users can access while running the wizard.
To add online help for new wizard, an organization needs to complete these steps:
- Write help documentation for the application and compile it into a Microsoft HTML (CHM) file.
- Add the CHM file to the Object Repository.
- Open the Wizards record and click the Help tab.
- Select the Show Help option.
- When selected, a Help button appears in the button bar along the bottom of the wizard. If a user clicks this button, the system opens the Help file specified in the Help Object field at the location specified by the Help URL field.
- Specify the Object Repository location of the CHM file in the Help Object field.
- Specify the name of the HTML page (included within the CHM file) that contains information about the specified wizard in the Help URL field.
- Save the Wizards record.
Defining Wizard Pages
The details of a metadata wizard are specified in one or more pages. By default, the wizard moves through the pages in order as specified on the Wizards record's Pages tab, but as described below, you can also add conditional logic via process flows to specify a next page to display based on a user's action.
Follow these steps to add pages to the wizard:
- Open the Wizards record.
- Click the Pages tab.
- Click the New button in the toolbar to open a new Pages record.
- Enter a Code for the page.
- This code can be referenced in process flows to determine which page to display based on a particular action. When assigning codes to steps, Aptify recommends that you assign the steps a letter in order (starting with A). See the Sample New Company wizard, which is included with Aptify, for an example of this convention.
- Enter a Name for the step.
- This name appears in the wizard's step list (if the wizard is configured to display a step list).
- Enter a Display Culture String for this step if localized users will run this wizard. The culture string you provide will be used to localize this step's name in the wizard's step list. See Using Localization Administration for more information on localization.
- Enter a Description of the step.
- Specify the Form Template that the wizard should use to display the content for this step.
- The form template contains the fields and text you want to display for a particular step. This field links to the Form Templates service.
- If you want to link a wizard page to an existing form template that is already used on a form in Aptify, create a copy of that template first and then link the copy to the wizard page. Also, use the Form Template Copy wizard to create a copy of the form template and its form template parts – do not clone the form template since this will not clone the linked form template parts and both templates will use the same parts, which can have undesirable side effects. See Using the Form Template Copy Wizard for information on how using the wizard.
- You can also create new Form Templates from scratch and then add fields and other parts using the Visual Designer (from the Form Templates record's Visual Designer tab). See Creating a New Form Template for details.
- You can also specify layout control logic on a page's form template to be used by the wizard. See Adding a Layout Control for details.
- Set the Width of the wizard page (or leave it at 0 to use the width from the specified Form Templates record).
- When greater than 0, this field specifies the width of the page within the wizard (in pixels). However, if left at 0, the system uses the default width from the Form Templates record instead. Note that if the wizard's width is set to 0, the widest step will set the width for the wizard.
- Set the Height of the wizard page (or leave it at 0 to use the height from the specified Form Templates record).
- When greater than 0, this field specifies the height of the page within the wizard (in pixels). However, if left at 0, the system uses the default height from the Form Templates record instead. Note that if the wizard's height is set to 0, the tallest step will set the height for the wizard.
- You can specify this page as a finish page by selecting the Is Finish Page option.
- Enabling this option allows for more complex metadata wizard implementations.
- Enabling this option allows for more complex metadata wizard implementations.
- Enter any additional information on the Comments tab.
- Specify any process flows that should fire based on a user's action within the wizard (clicking Before, Next, Finish, or Cancel). See Using Process Flows to Add Functionality and Conditional Paging Logic for details.
- Repeat the steps above to add other pages to the wizard.
When finished, you should have a Pages record for every page of the wizard. In the example shown below, an Opportunity Knocks wizard that creates new Opportunities records has four pages (labeled A to D).
A user who runs this wizard sees the following pages:
-
Page 1: Enter general opportunity information (corresponds to fields on the top area of the Opportunities form).
-
Page 2: Enter Status details for the opportunity (corresponds to fields on the Opportunities form's Status tab).
-
Page 3: Specify Line Items for the opportunity, if known (displays sub-type control for Opportunity Line Items sub-type).
-
Page 4: Enter additional comments (added to Opportunities record's Comments tab).
Defining When Process Flows are Run for a Wizard
If desired, you can configure the wizard to run a Process Flow when a user either finishes or cancels a wizard. For example, when the user completes a wizard, it can automatically run a process flow to generate a related record, such as a Contact Log or Task.
These settings are specified in the top area of the Wizards record's Processor tab.
See How to Create a Process Pipeline for information on how to create Process Flows in Aptify.
Follow these steps to configure when a wizard runs a process flow:
- Open the Wizards record.
- Click the Processor tab.
- Configure the Finish Mode to specify what action to take when a user clicks the Finish button on the wizard. The available options are:
- Save Entity: Save the record that the user is creating or updating via this wizard.
-
Run Process Flow: Run the specified Finish Process Flow. When this step is selected, the new or existing record loaded into the wizard is not saved before running the process flow. In this case, the process flow will perform a save operation to commit information to the database (based on the wizard's design).
- Note that if you select this option, the specified process flow must save the record stored in the wizard's GE Object (to successfully create or update the record). For example, you could use the Run Process Flow option to execute a process flow that creates a sub-type record for the wizard's record (via a standard Aptify sub-type CRUD (Create, Read, Update, and Delete) component) and then saves the top level record as part of that operation.
- If you select the Run Process Flow option, the final step of the Process Flow should close the wizard using a Set Wizard Result step. The wizard will not close automatically.
- Save and Run Process Flow: Save the record that user is creating or updating via this wizard first and then run the specified Finish Process Flow.
- If you selected a Finish Mode of Run Process Flow or Save and Run Process Flow, enter the process flow to execute when a user clicks the Finish button on the wizard in the Finish Process Flow field.
- The wizard can pass its GE object, which contains all user inputs, to the process flow as an Input Property called GEObject. A process flow can then retrieve these values and use them as needed (such as to populate other records).
- For example, an organization might want to generate a Status Report when a new Opportunities record is generated from a New Opportunity wizard. In this case, using the wizard's GEObject as an input property, the Generate Status Report process flow can use a rule or the Value Retriever component to obtain the Opportunity ID, AccountManagerID, and other fields to pass into the Create Opportunity Status Report Component. See the example below.
- Configure the Cancel Mode to specify what action to take when a user clicks the Cancel button on the wizard. The available options are:
- Close Form: Close the wizard without performing any additional actions.
- Run Process Flow: Run the specified Cancel Process Flow. When this step is selected, the process flow runs before the wizard is closed.
- Close Form and Run Process Flow: Close the wizard and then run the specified Cancel Process Flow.
- If you selected a Cancel Mode of Run Process Flow or Close Form and Run Process Flow, enter the process flow to execute when a user clicks the Cancel button on the wizard in the Cancel Process Flow field.
- As with the Finish Process Flow, the wizard can pass its GE object, which contains all user inputs up to the point when it was cancelled, to the process flow as an Input Property called GEObject. A process flow can then retrieve these values and use them as needed.
- You can define a processor sub-class for the wizard. If you need to define a processor sub-class, enter information the following fields in the Processor Sub-Class area:
- In the Object field, specify the Object Repository location of a wizard-specific or organization-specific processor.
- Aptify includes a standard processor that provides the business logic for the wizard (this logic applies regardless of whether the wizard is run from the Windows application or the Aptify web interface).
-
If necessary, a developer can implement his or her own processor object to change any of this logic.
Any new processor object should be a sub-class of the base AptifyWizardProcessor object. See the Aptify Software Development Kit (SDK) for information on this object.
- In the Class field, specify the fully qualified namespace/class name that provides the processor logic contained in the Processor Object.
- In the Assembly field, specify the name of the Processor Object's assembly.
- In the Object field, specify the Object Repository location of a wizard-specific or organization-specific processor.
- You can configure the Start Mode to specify what action to take when a user clicks the Start button on the wizard. The available options are:
- Start Form: Start the wizard without performing any additional actions.
- Run Process Flow: Run the specified Start Process Flow. When this step is selected, the process flow runs before the wizard is started.
- Start and Run Process Flow: Start the wizard and then run the specified Start Process Flow.
- If you selected a Start Mode of Run Process Flow or Start and Run Process Flow, enter the process flow to execute when a user clicks the Start button on the wizard in the Start Process Flow field.
-
The wizard can pass its GE object, which contains all user inputs, to the process flow as an Input Property called GEObject. A process flow can then retrieve these values and use them as needed (such as to populate other records).
-
- Save the Wizards record.
Using Process Flows to Add Functionality and Conditional Paging Logic
The Wizard infrastructure supports the ability to fire a process flow based on a user's interaction with the buttons at the bottom of the wizard. Each wizard page can be linked to one or more process flows on the Pages record's Process Flows tab.
A wizard designer can specify that a process flow should execute based on one of the following events:
- Before Next: Fire the specified process flow after the user clicks the Next button but before proceeding to the next page.
- After Next: Fire the specified process flow after the user clicks the Next button and after proceeding to the next page.
- Before Back: Fire the specified process flow after the user clicks the Back button but before proceeding to the previous page.
- After Back: Fire the specified process flow after the user clicks the Back button and after proceeding to the previous page.
- Before Finish: Fire the specified process flow after the user clicks the Finish button but before completing the wizard.
- After Finish: Fire the specified process flow after the user clicks the Finish button and after completing the wizard.
- Before Cancel: Fire the specified process flow after the user clicks the Cancel button but before canceling the wizard.
- After Cancel: Fire the specified process flow after the user clicks the Finish button and after cancelling the wizard.
One of the primary uses for this functionality is to enable conditional logic to move between pages in a non-linear fashion. For example, in the sample Opportunity Knocks wizard described above, a user may not have Line Items to enter for a new opportunity. In this case, the user experience could be improved by first asking the user if he or she has Line Items to enter. If the user clicks Yes, then the wizard should display the Line Items page; if the user clicks No, then the wizard should skip the Line Items page (step 3) and proceed directly to Step 4.
Follow these steps to link a process flow to a trigger event within the wizard:
- Open the Wizard Pages record to which you want to attach a Process Flow.
- For the Line Items conditional logic described in this section, the designer would attach the process flow to Page 2 (code B) so that it fires before proceeding to Page 3, the Line Items page.
- Click the Process Flows tab.
- Open an new Process Flows record.
- Select the event Type from the drop-down list.
- In the example below, the selected Type is Before Next, since the designer wants to display the "Do you want to enter Line Items?" message box before proceeding to the next step.
- Specify the Process Flow to fire when the trigger event (specified in the Type field) occurs.
- See How to Create a Process Pipeline for general information on how to create Process Flows in Aptify. The information below provides information that is specific to creating a process flow for wizard pages.
- Process Flows attached to a wizard page typically use one or more input properties that are passed in from the wizard. Note that you should name the input properties exactly as shown below (they are case sensitive).
- GEObject: This object stores all of the user inputs within the wizard up until the time the process flow executed.
- Result: This object specifies the wizard's current position within the pages.
- SelectedItems: If the wizard is launched from a list view, this property passes in the IDs of the records selected in the source view (or all records in the view if none are selected). This property is used by wizards that operate on a set of records passed in from a view, such as the Account Manager Transfer wizard and the Bulk Write-Off wizard. Review the configuration for those wizards within Aptify for examples of how this property is used by a metadata wizard.
- To control the wizard's action following the execution of the process flow, the process should include one or more steps that use the Set Wizard Result component. This component provides instructions to the wizard for how it should proceed. The standard result options include continue to a specified page, finish the wizard, cancel the wizard, display an internal error message, make no change to the default paging logic, and open the wizard's on-line Help window.
- When passing in the ResultObject to a Set Wizard Result step, you must enter the Context Object that is named exactly as Result.
- See the Test Process Flow that is included with Aptify as part of the Sample New Company wizard for an example.
- The figure below illustrates a Prompt for Line Items process flow that fires based on the Before Next trigger when a user clicks Next on Page 2 of the Opportunity Knocks wizard. The first step of this Process Flow is a Message Box that asks the user if there are line items to enter. If the user selects Yes, the process flow proceeds to the Show Line Items Page step that instructs the wizard to proceed to page C (that is, the selected Result is Continue to Specified Page and the GoToPageCode is set to C).
- Click OK to save and close the Process Flows record.
- Click OK to save and close the Pages record.
- Save the Wizards record.
About the Advanced Wizard Options
The metadata wizard infrastructure provides a standard processor and rendering objects that control the behavior of the wizards and their appearance. If necessary, a developer can create his or her own processor and/or rendering objects to modify the features and functionality provided by the standard objects.
Processor Object
Aptify includes a standard processor that provides the business logic for the wizard (this logic applies regardless of whether the wizard is run from the Windows application or from Aptify Web Access). If necessary, a developer can implement his or her own processor object to change any of this logic. Note that any new processor object should sub-class the base AptifyWizardProcessor object. See theAptify Software Development Kit (SDK)for information on this object.
Once this processor object has been created, the developer or an administrator adds it to the Object Repository and specifies the files details on the Wizards record's Processor tab, including:
- Processor Object: This field specifies the Object Repository location of a wizard-specific or -organization-specific processor.
- Processor Class: This field specifies the fully qualified namespace/class name that provides the processor logic contained in the Processor Object. "
- Processor Assembly: This field specifies the name of the Processor Object's assembly.
Rendering Objects
Aptify provides a standard user interface model for rendering metadata wizards within Aptify's Windows application and Aptify Web Access. However, if necessary, a developer can implement his or her own Windows or Web object to change the appearance of a wizard or wizards. Note that any new rendering object should sub-class the base Aptify GenericWizardForm class. See the Aptify Software Development Kit (SDK) for information on this class.
Once this rendering object has been created, the developer or an administrator adds it to the Object Repository and specifies the files details on the Wizards record's Rendering tab (complete the set of Windows or Web fields depending on the nature of the object):
- Object (Windows or Web): This field specifies the Object Repository location of a wizard-specific or organization-specific user interface design for the wizard.
- Class (Windows or Web): This field specifies the fully qualified namespace/class name that provides the logic contained in the rendering object.
- Assembly (Windows or Web): This field specifies the name of the rendering object's assembly.
Comments
Please sign in to leave a comment.